How Do I Wrap Text on Google Drawings
Text wrapping is a feature in Google Docs that allows you to properly position images and other objects (such as shapes) in your document.
Using this feature will not only make your document look cleaner, but it will also save space which is especially useful if you are printing out the document.
In this article, we will be talking about the text wrapping feature in Google Docs- what it is, why it is useful and how to use the feature in your document.
Let's get started.
What is text wrapping?
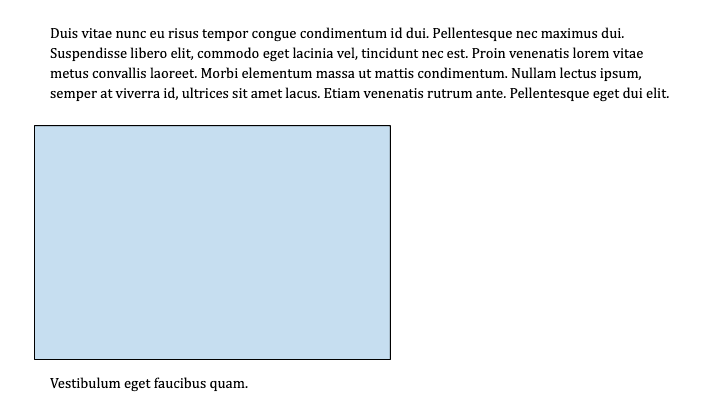
Text wrapping is a feature that surrounds an image, shape or other objects you insert in your document with text. By default, when you insert an image in Google Docs, the text appears on a line right below the image. This is because of the break text setting and you can see how it works in the screenshot below:
Hence, there is a lot of area around the image (if the image is in the centre, to the left and right of the image, for example) that is not being used. Instead of wasting this space, you can use the text wrapping feature to insert text there.
This feature also ensures that there is a consistent gap between the boundary of a particular image and the text. For example, the distance between the right side of the boundary and the surrounding text is the same as the distance between the left side of the boundary and the surrounding text. This is illustrated in the picture below:

A third option for image placement- other than break text and text wrap- is inline. This means that your image will be treated as any other character and would appear on the same line as the corresponding line of text. This changes the spacing between the line that the image is on and the line directly above it, as you can see here:

Why is text wrapping useful?
One important reason why you might want to use text wrapping is that it allows you to save space. You can see from the images for the break text and inline settings that there is a lot of empty space surrounding the images. However, when you use the text wrap option, this empty space is filled with text which is a much better use of the space in your document.
This is especially true if you are printing the document and have a lot of images, as you will be able to save paper and ink using this feature.
Another reason why you might want to use the text wrapping feature is for the aesthetics: some people feel that their document looks cleaner when the text is wrapped around their images. It's up to you how you feel about the look of text wrapping.
It can also improve your document's readability as it gives you the option of inserting an image in between text without creating a large gap between them.
Steps to wrap text in Google Docs
Now that we know what text wrapping is and how it's useful, let's look at the steps for wrapping text around an image in Google Docs. Not to worry as this is a pretty simple process. Note that other word processing software- such as MS Word and Pages- also offer this feature.
Step 1: Open your Google Docs document.
First, open up the Google Docs document in which you want to use the text wrapping feature. Just go to the Docs homepage (docs.google.com) and choose a file under 'Recent documents.'

You can also create a new document, either by clicking on the plus sign at the top of the page to create a blank document or by using one of the many templates.
(Optional) Step 2: Insert your image
If you haven't already, insert an image of your choice in your document. You can do this by either dragging the image from your computer to the Google Docs page or using the 'Insert' option.
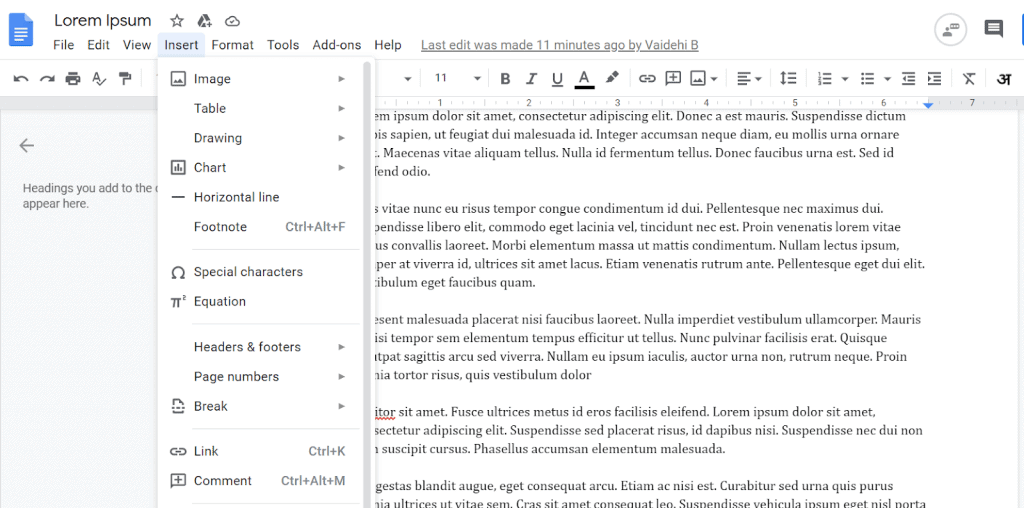
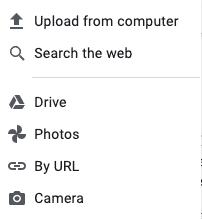
Click on the 'Insert' tab at the top right corner of the page. The very first option is the option to insert an image. When you hover over it, you will be shown a couple of options for image sources (your computer, online, Google Drive, etc.). Pick a source, select your image then upload it.
You can skip this step if you already have all the images you want in your document.
Step 3: Select the 'Wrap text' icon from the box below the image.
Select an image that you would like to wrap text around. When you select it, a box will appear below the image with a few icons (the first one is the 'In line' icon).
The second icon is the 'Wrap text' option. Click on it to wrap text around the image.

The text wrapping will apply to your image irrespective of where it is in the document.
(Optional) Step 4: Further format the image.
You can go a step further in formatting your image. Firstly, you can adjust the margins for your image, or the space between the borders of the image and the surrounding text. You have several options for this and you can even choose a custom option.

Another aspect that you can change is the position of the image. There are 2 options that Google Docs provides: 'Move with text' and 'Fix position on page.'

The 'Move with text' option gives your image the flexibility to move as you edit your text. So, for example, if you add new lines above your image, the image will move downwards along with the text.
On the other hand, the 'Fix position on page' option keeps your image in the same position. Hence, it will not change as you edit your text.
Note that if the text surrounding your image is related to the image (e.g. the surrounding text is explaining what the image is showing), it makes more sense to use the 'Move with text' option.
But if you just want to have specific images in specific positions in your document, then you should go for the 'Fix position on page' option.
Undoing text wrapping
If you want to undo the text wrapping, simply select the image and click on the first icon (the 'In line' option) or the last icon (the 'Break text' option).
Conclusion
To summarise, in this article we covered the basics of text wrapping: what it is and how it is useful. We also covered the steps for wrapping text in Google Docs and how you can undo this action.
Thank you for reading and we hope you found this article useful!
How Do I Wrap Text on Google Drawings
Source: https://officebeginner.com/gdocs/how-to-wrap-text-in-google-docs/